907 - OnePage WP Parallax Documentation
Thank you for purchasing my theme. If you have any questions that are beyond the scope of this help file, please feel free to email via my user page contact form here. Thanks so much!
Files The What and Where
Documentaion Folder
This is the folder containing this documentation that you are now viewing. No Need to upload it, just keep handy for when you need to refer back to.
sample-data Folder
This folder contains sample data that can be imported as well as a sample theme options that can be used in the theme options panel.
changelog.txt File
This file contains and changes in updates that where made, each theme update will come with any changes to files, etc.
READ-FIRST.txt File
This File just contains some general info about files within folder.
ninezeroseven_1.0.zip
This is your Wordpress theme file for 907 parallax theme that you add to your themes directory of Wordpress.

Install Lets Begin
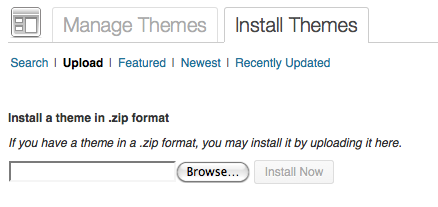
Uploading Theme
Inside your Wordpress admin area, go to Appearance > Themes at the top you'll see "Install Themes" click that tab and the click the link that says "Upload". In the upload box select the ninezeroseven_1.0.zip folder and click upload.
Activate Theme
Back at Appearance > Themes click the "Activate" link under NineZeroSeven. Congrats! Your Theme is now installed!

Sample Data Get ya started
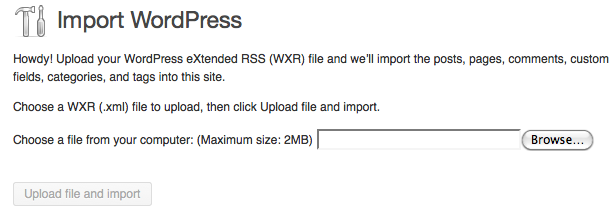
Install Sample Data
Inside your Wordpress admin area, go to Tools > Import click on the "Wordpress" and install that plugin if it isn't already. Then choose the browser button and select/upload the sample-data.xml file that is located inside the sample-data folder.
Add Sample Options
Go to Appearance > Theme Options Then in the themeoptions panel click the "Backup Options" tab at the bottom. In the text area that is below "Transfer Theme Options Data" Delete that code there and paste in the code from the sample-theme-options.txt file that is located in the sample-data folder. Click Import and that's it.. :)

Menu Setup Set Up
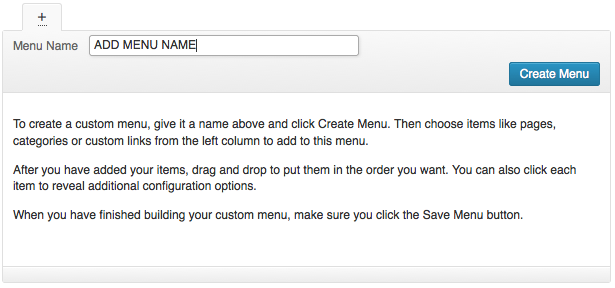
Creating Menu
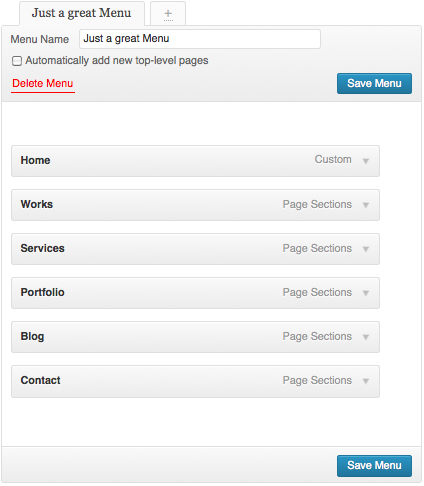
1) Go to Appearance > Menus. Enter a menu name and click "Create Menu".
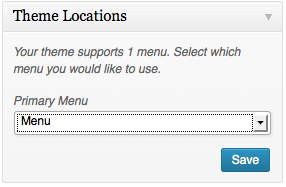
Setting Menu
2) Select your menu name for Primary Menu
Add Home Link
3) In the "Custom Link" box add a URL with #up and Label Home or whatever you want for your homepage link to read. Click "Add to Menu".

Adding Page Sections
4) In the "Page Sections" box, check the boxes you want in the menu and want to show on front page.
Unchecked Page Sections will not be displayed on front page, you can use them for pages and post though. :)
Click "Add to Menu".

Save Menu
5) Click "Save Menu", your done.. :)
When you arrange the menu order by dragging and dropping, it arranges the Page Sections on the front page.
Page Sections Create and Display
Adding Page Sections
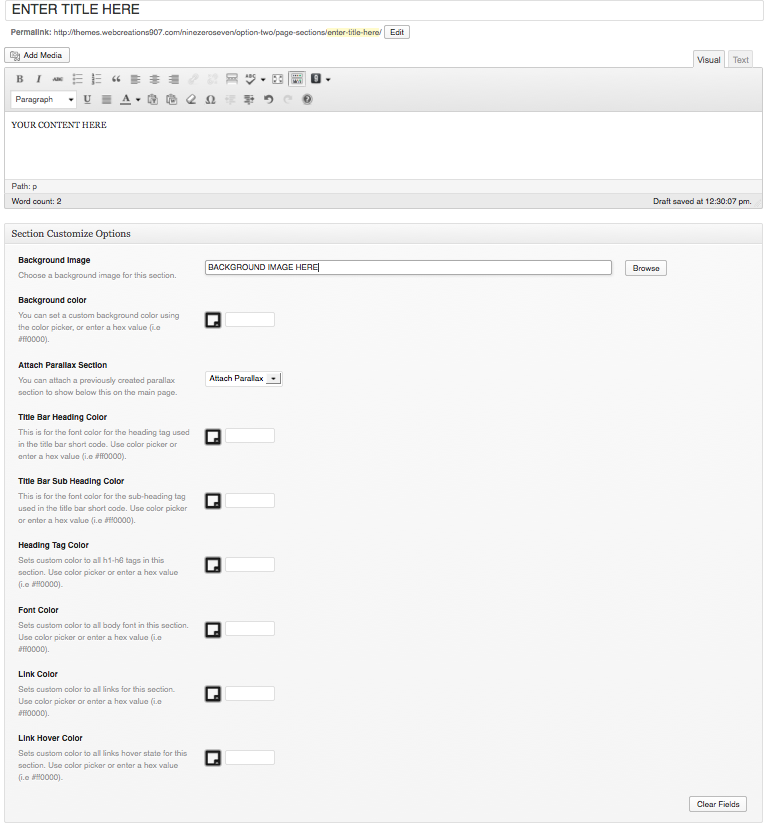
On the Page Sections Tab click "Add New Section", Enter your Title, short is fine cause the title isn't displayed. It's used for the menu though. Add your content/shortcodes in the content area. Optional you can adjust the sections colors/background image in the customize options.. Also in the drop down box "Attach Parallax" select a parallax section you'd like displayed below it on the front page.
Parallax Sections Create and Display
Adding Parallax Sections
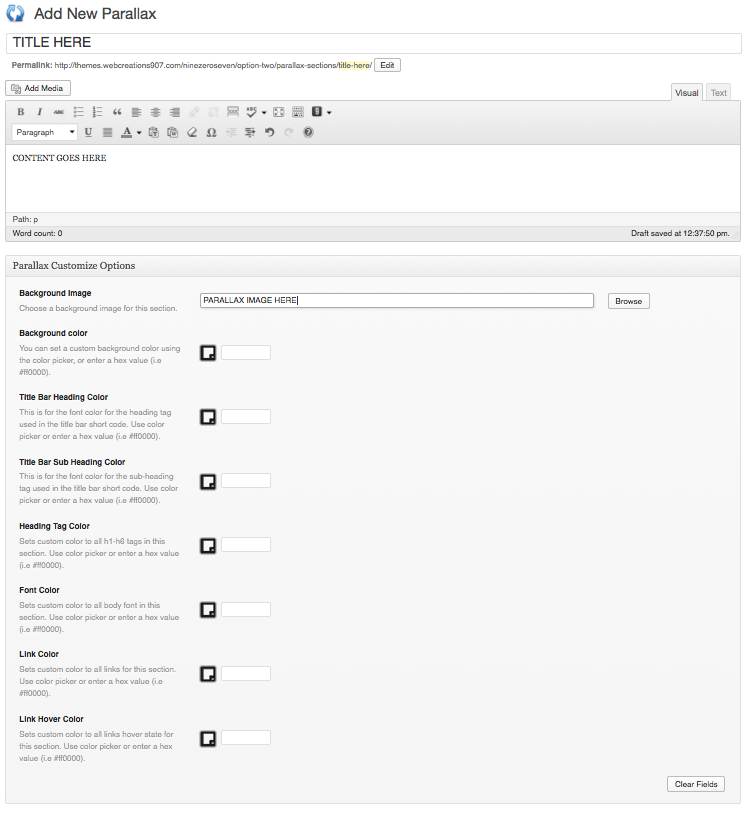
On the Parallax Sections Tab click "Add New Section", Enter your Title, short is fine cause the title isn't displayed. Add your content/shortcodes in the content area. Upload a image you'd like to be displayed/parallaxed in the background image. Or if you just want a colored background you can use the background color option.
Recent Works Create and Display
Adding Recent Works
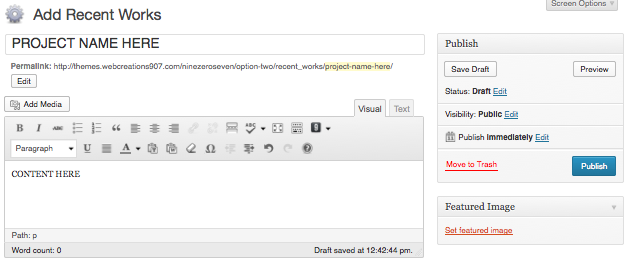
On the Recent Works Tab click "Add Recent Works", Enter your title, and content. Also set a "Featured Image" that will be displayed.
Portfolio Create and Display
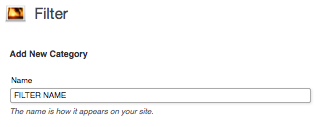
Adding Filter
On the Portfolio Tab click "Filter", Enter a name and click "Add New Category". Repeat for each filter you'd like the portfolio to have. ie: videos, images, etc.
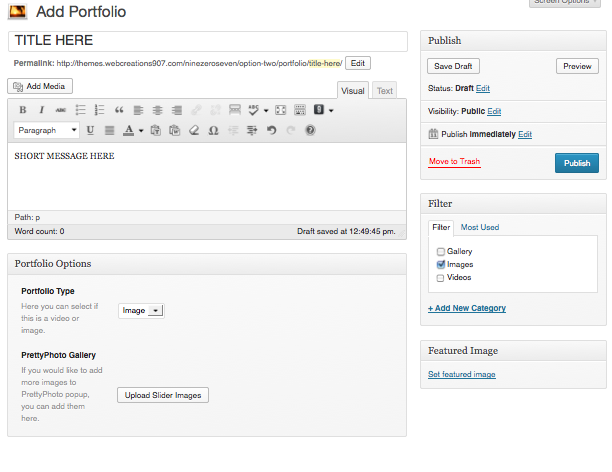
Adding Portfolio
On the Portfolio Tab click "Add Portfolio", Enter titles, message, and set a featured image. Don't forget to select a "Filter" for each item.
From the dropdown you can also select to show a image gallery OR video when potfolio item clicked to be display in prettyPhoto..
Portfolio Type: Image
Press the "Upload SLider Images" button, upload photo and click "Insert To Post". Repeat for each image you wanna have in the gallery/slideshow.
Portfolio Type: Image
Select the "Video" option from the drop down box, and enter your video(youtube/vimeo) in to the "Add a Video Link" Box.
Team Members Who's On
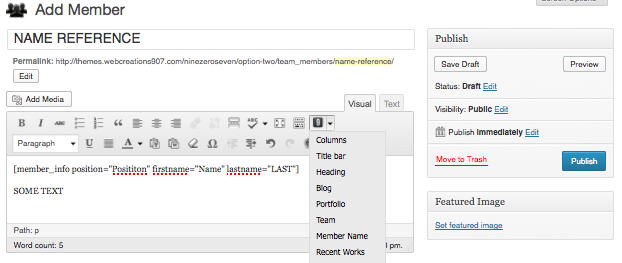
Adding Member
Enter members name or what ever where it says "NAME REFERENCE". This is just used for your reference in the admin area.
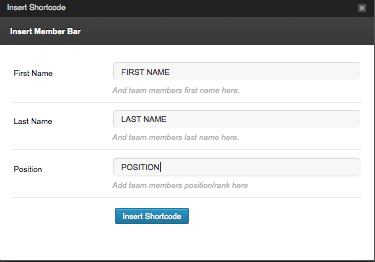
From the shortcode dropdown select "Member Name", box will pop up(see below) enter first name, last, and postion and click "Insert Shortcode". On line below that code that just got put in there, enter some bio text.
Set a featured image that will be used for team image.
shortcode box
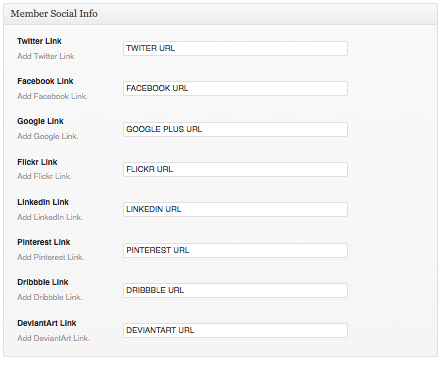
Member Social Links
Enter which ever social links you'd like for current member. Fields blank won't show up, so just use which ever ones you need/have..
Regular Post Blog it
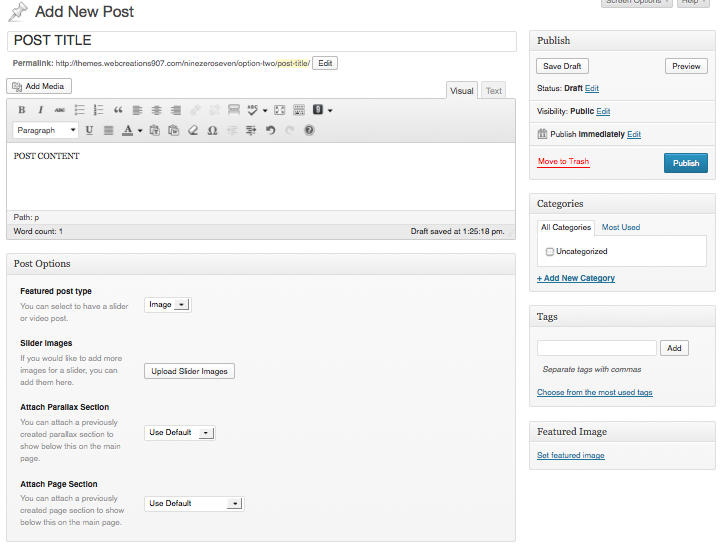
Add Post
Go to Post > Add New. Enter your post title, and post content.
Set Featured Image
This is optional, if you don't want to display any image for the blog post. But this is needed if you choose to have image/slider/video
Featured: Slider
If you'd like a slider for post image, then click the "Upload Slider Images" button, and upload and click "Insert into Post" for each image you wanna have in the slider. Don't forget to set a featured image.
Featured: Video
Select "Video" from the drop down box, and insert your video link in the "Add Video Link" feild.
Attach Parallax and Page Section
This is optional.. From the drop downs in the post options, you can select to add a different parallax section below the post as well as option to add different page section.
You can set it to use default as well, which will use the default sections that you set up in the theme options panel. Or you can set to none.. :)
Home Settings Options Theme Options Panel
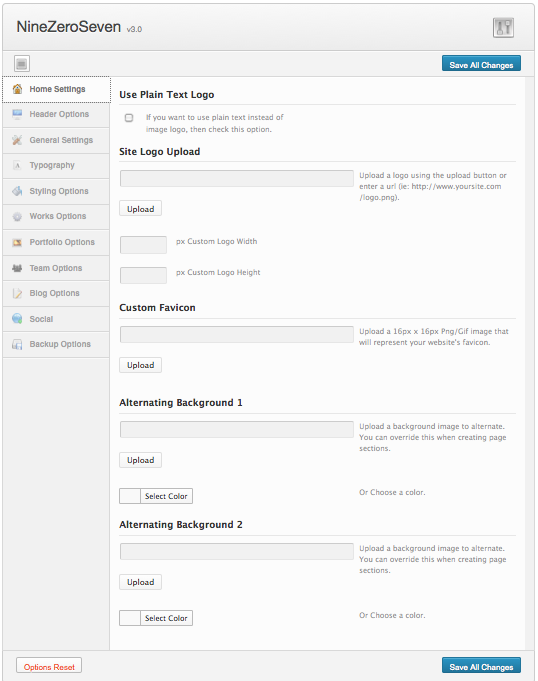
Logo
If you want plain text instead of logo, then check the checkbox.
You can use the site logo upload to upload your logo, also enter a custom logo size if needed
Custom Favicon
If you'd like a fav icon upload it here
Alternating Backgrounds
For these sections you can choose default alternation background images by uploading a image in each field. Or you can choose a background color.
Header Options Theme Options Panel
Which Header
Using the dropdown box, select which header you'd like displayed.
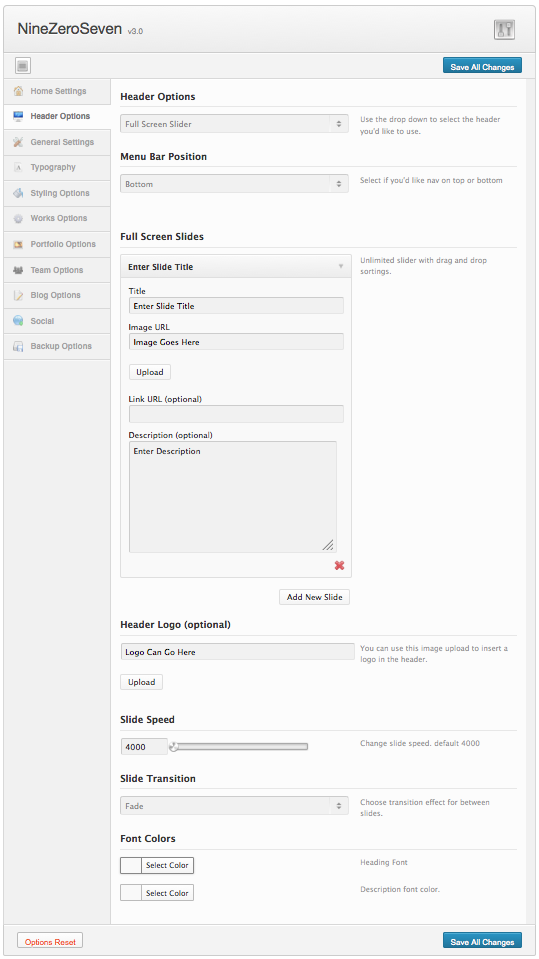
Menu Bar Position
All header options have this, you can choose top or bottom position for where you want the nav bar.
Heading Text (optional)
This is your main text title that appears in the header.
Description Text (optional)
This text appears right below the heading text in the header
Parallax Header Image
Upload a image here that will be used in the header.
Header Logo (optional)
You can upload a header logo, this logo will be display above the header title.
Font Colors
You can change the color of the title and description text here.

Flex Slider Header
Click the "Add New Slide" button. Enter title, description and upload a image. Repeat steps for each slide you want. You can sort them also by dragging them up/down where wanted..
Background Image (optional)
If you'd like a different background image you can enter it here.
Color Options
You can change the color of the title, description font and the frame around the image here.

Full Screen Slider Header
Click the "Add New Slide" button. Enter title, description and upload a image. Repeat steps for each slide you want. You can sort them also by dragging them up/down where wanted..
Header Logo (optional)
You can upload a header logo, this logo will be display above the header title.
Slide Speed
You can adjust the speed of the slide show by moving the slider handle.
Slide Transition
Using the dropdown menu you can change the transition effect for the slideshow.
Font Colors
You can change the color of the title and description text here.
Custom Header
Enter html or shortcodes into the "Custom Header Code" box.
Background Image (optional)
You can upload a background image and also using the dropdown menu select if you want repeat,no-repeat,etc.

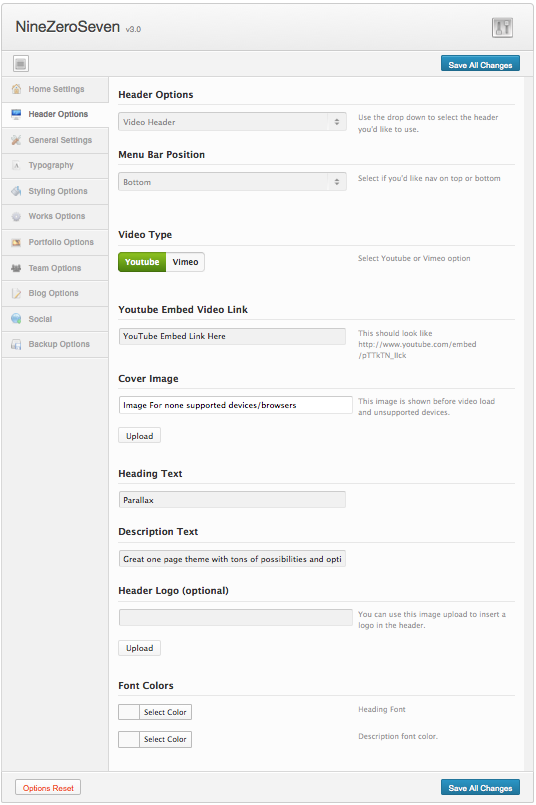
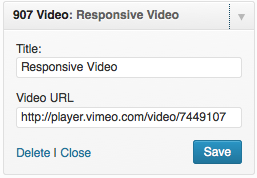
Video Header
Using the switch you can select Youtube of Vimeo.
The steps below apply for both options
Youtube Embed Video Link
Enter your Youtube embed link type this link should look like below
http://www.youtube.com/embed/pTTkTN_IIck.
For Vimeo it will look like below
http://player.vimeo.com/video/7449107
Cover Image
This image is the cover image that will be shown before the video is loaded and for none video supported devices
Heading Text (optional)
This is your main text title that appears in the header.
Description Text (optional)
This text appears right below the heading text in the header
Header Logo (optional)
You can upload a header logo, this logo will be display above the header title.
Font Colors
You can change the color of the title and description text here.
General Settings Theme Options Panel
Responsive Layout
You can enable/disable the responsive layout by using the switch.
Default Parallax & Default Page Section
You can set a default parallax and page section using the dropdown boxes. These are used for any subpages, post, etc.
Tracking Code
This can be your stat counters and such.
Footer Text
Enter your copyright or whatever you want that will be displayed in the footer bar.

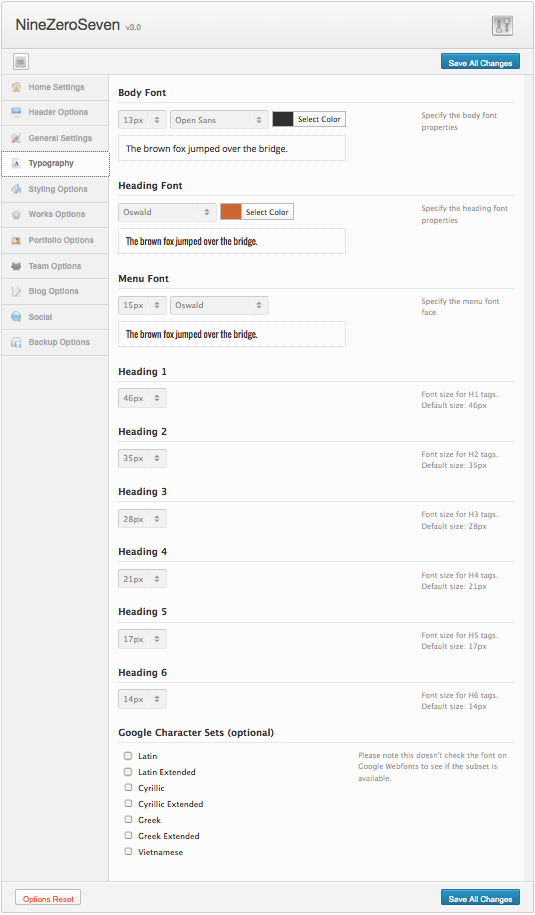
Typography Theme Options Panel
Body font,Heading Font, Menu Font
You can change these font faces here as well as the default colors and sizes.
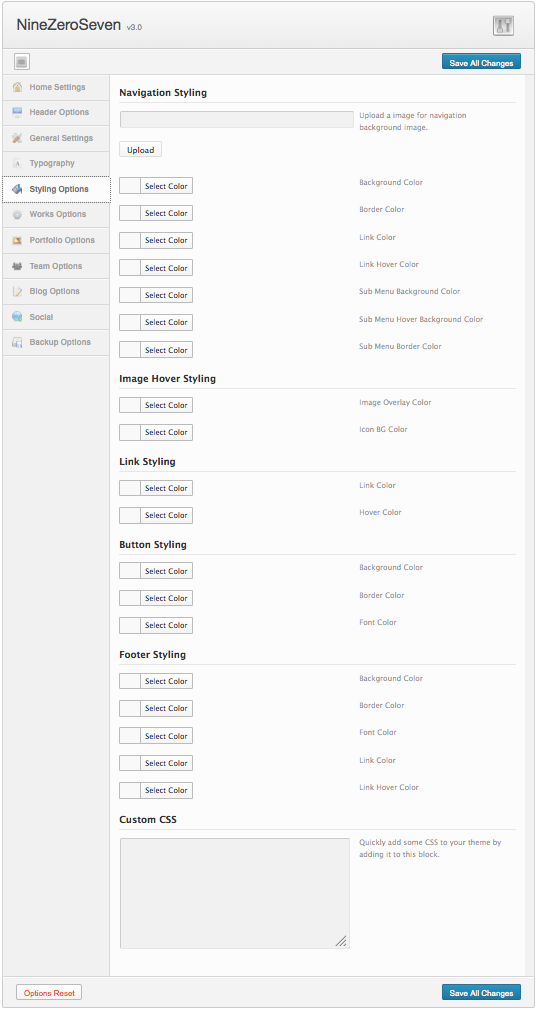
Styling Options Theme Options Panel
Navigation Styling
You can upload a background image for the top main nav bar or choose a background color. As well you can set a border,link, and active link color using the color pickers
Image Hover Styling
This is to change the colors when mouseings over the images.
Link Styling
You can set default link colors for both active and hover states
Button Styling
You can set a default button color for background, corder and font.
Footer Styling
Allows you to set background colors, border color, font color and link colors.
Custom CSS
This is where you can add your own custom CSS to be added to the page.
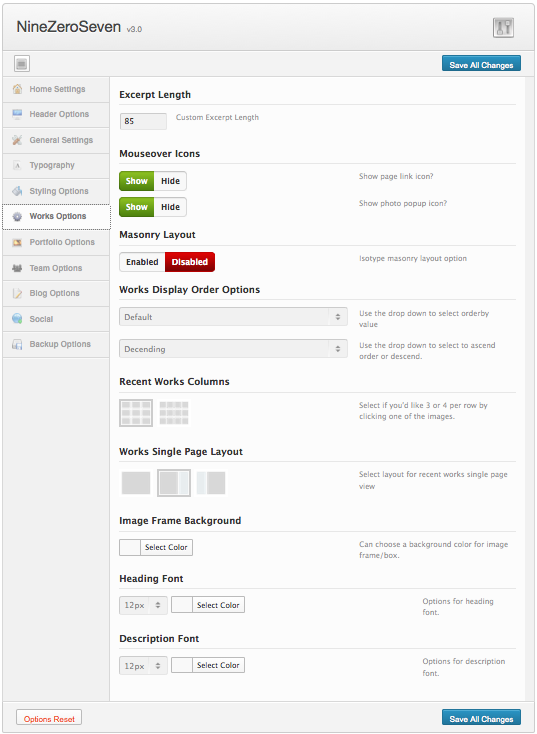
Works Options Theme Options Panel
Exceprt Length
You can increase/decrease the excerpt lenght. This is the text that is displayed when viewing all work items in the grid.
Mouseover Icons
You can chose to show/hide the mouse over links on the works here by using the switch.
Masonry Layout
This is the masonry layout(isotype), you can enable or disable it here.
Works Displays Order Options
To change the order of how your works are displayed you can use the dropdown menus.
Recent Works Columns
Options between 3/4 column layout.
Works Single Page Layout
This is for the single page view, you can choose between full,right sidebar or left sidebar by clicking the images.
Image Frame Background
This is the color of that background that the image is in.
Font Colors
You can change the color of the heading and description text here.
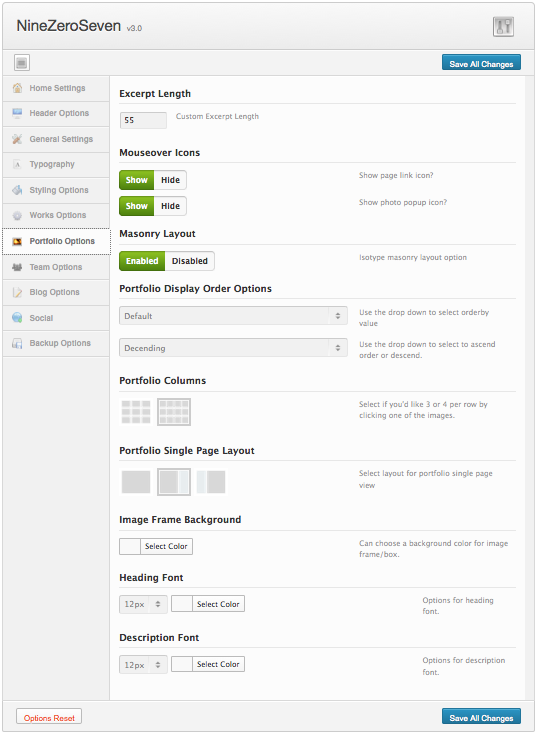
Portfolio Options Theme Options Panel
Exceprt Length
You can increase/decrease the excerpt lenght. This is the text that is displayed when viewing all portfolio items in the grid.
Mouseover Icons
You can chose to show/hide the mouse over links on the portfolio here by using the switch.
Masonry Layout
This is the masonry layout(isotype), you can enable or disable it here.
Portfolio Displays Order Options
To change the order of how your portfolio are displayed you can use the dropdown menus.
Portfolio Columns
Options between 3/4 column layout.
Portfolio Single Page Layout
This is for the single page view, you can choose between full,right sidebar or left sidebar by clicking the images.
Image Frame Background
This is the color of that background that the image is in.
Font Colors
You can change the color of the heading and description text here.
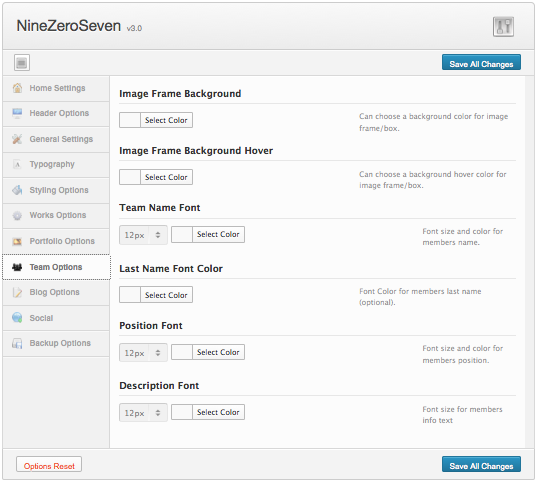
Team Options Theme Options Panel
Border Color
You can change the color of the team section border that is around the members image for both hover and default states.
Typography
You can change colors, and font sizes for members name, last name , position and description fonts.
Blog Options Theme Options Panel
Single Post Page Layout
This is for the single page view, you can choose between full,right sidebar or left sidebar by clicking the images.
Front Blog Layout
This is for the front single view, you can choose between full,right sidebar or left sidebar by clicking the images.
Image Frames
You can change the color of the image,video frames using the image frame color option.
Typography
You can change colors, and font sizes for main text, link colors, widget heading/font, and meta font.

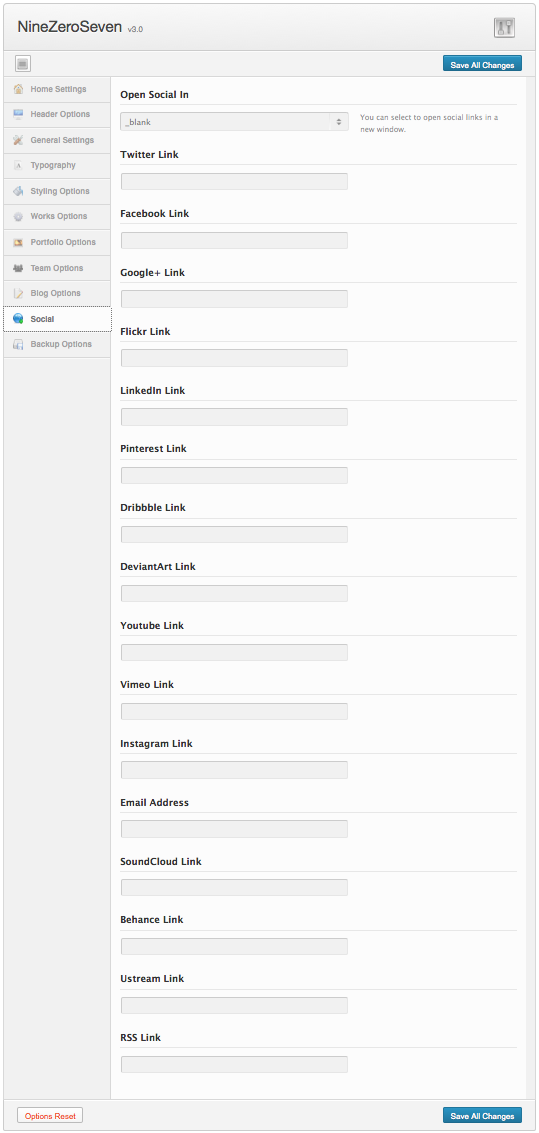
Social Theme Options Panel
About
This is used for the social links for header option(fullslider/parallax) and the social link shortcode.
Just enter the full URL for each social link/icon you want displayed. Leave any unwanted ones blank and they won't be displayed.
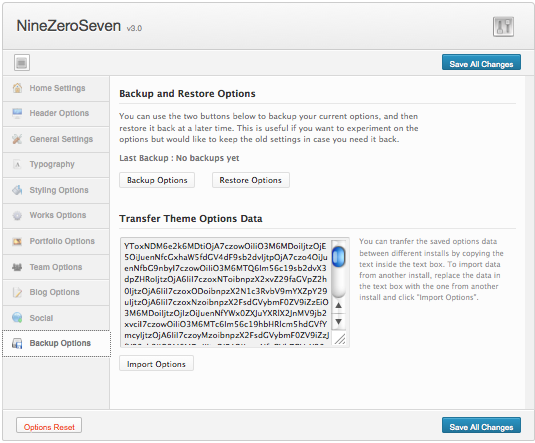
Backup Options Theme Options Panel
About
You can use this section to backup options and import options.
Overview Short Codes
About
On the editor, click the "9" icon to see list of shortcodes and access the shortcode generator. Some of the the codes are instantly inserted and others will bring a popup box up and have infomation for you to fill in.
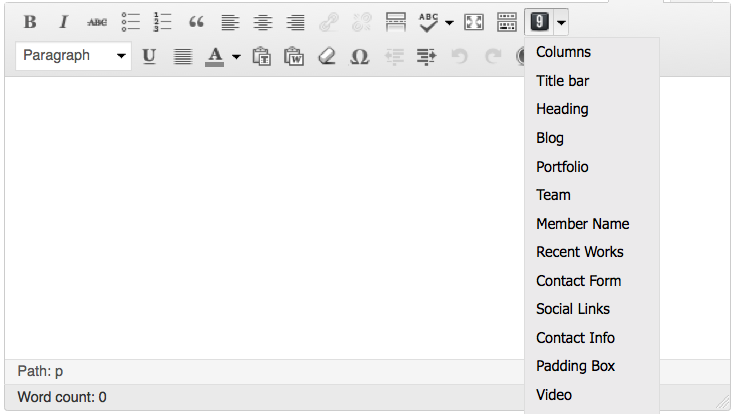
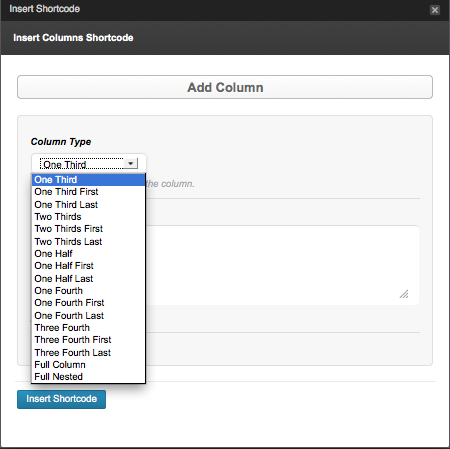
Columns Short Codes
Usage
In this box select the size column you'd like, put content/text in the text area and click "Insert Shortcode".
The Options that have "First/Last" are for when you wanna nest a box inside another.
Title Bar Short Codes
Usage
This shortcode will insert a title bar with a subheading, these are used anywhere. But mostly they are use for the page section post type and should be the first content added to a page section.
So in the box enter sub heading and heading then click the "Insert Shortcode" button.

Blog Short Codes
Usage
This is used for page sections, when clicked it instantly puts shorcode in editor.
[blog]
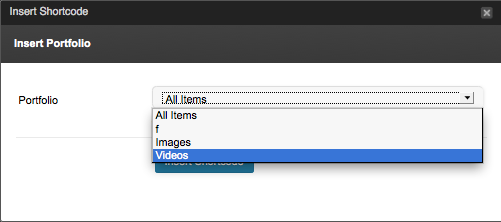
Portfolio Short Codes
Usage
If you just want to show one category of images you can use the dropdown then click the insert shortcode button.
Team Short Codes
Usage
This is used for page sections, when clicked it instantly puts shorcode in editor.
[team]
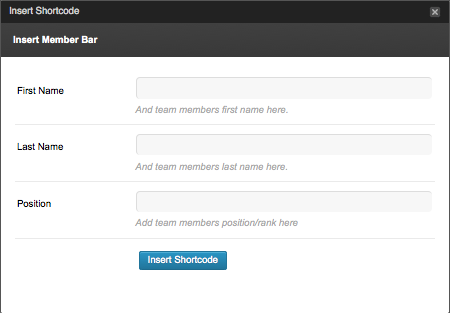
Member Name Short Codes
Usage
This shortcode is used for team members post type, should be the first content entered in editor.
Fill in name(first & last), then position and click "Insert Shortcode".
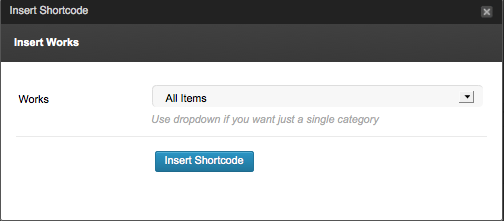
Recent WorksShort Codes
Usage
If you just want to show one category of images you can use the dropdown then click the insert shortcode button.
Contact Form Short Codes
Usage
When clicked it instantly puts shorcode in editor.
This uses the email that you have set in your admin area at Settings > General
[nzs_contact_form]
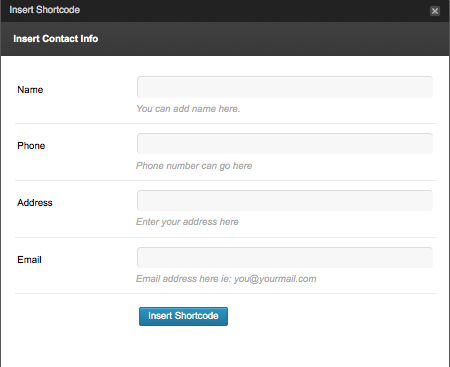
Contact Info Short Codes
Usage
This is used for contact info list. Fill in fields you want shown and click the "Insert Shortcode" button.
Padding Box Short Codes
Usage
This shortcode can be used to space things when needed.
Enter a numbe only in the desired spot(s), click "Insert Shortcode" and Replace the "CONTENT GOES HERE" with your content you want inside the box.

Video Short Codes
Usage
This is for adding videos, add a youtube or vimeo link and click the click "Insert Shortcode" button.

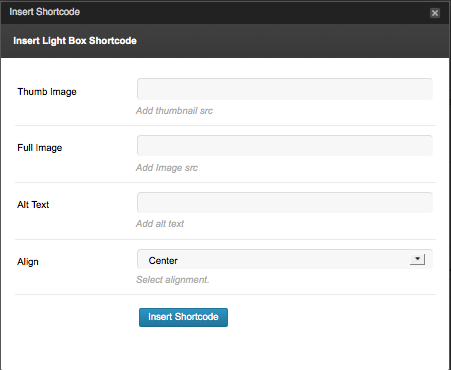
Light Box Short Codes
Usage
This adds a image that will popup in prettyPhoto box when clicked.
Add your image path for the thumb and full image. Add alt text and you can select to align it left,right and center. Click "Insert Shortcode".
Pricing table Short Codes
Pricing Table Holder
First thing to do is click "Price Table Holder", which is going to insert code instantly. Delete the "Put Plans In Here" and start adding plans so they are inside there.
[price_table] Put Plans In Here [/price_table]
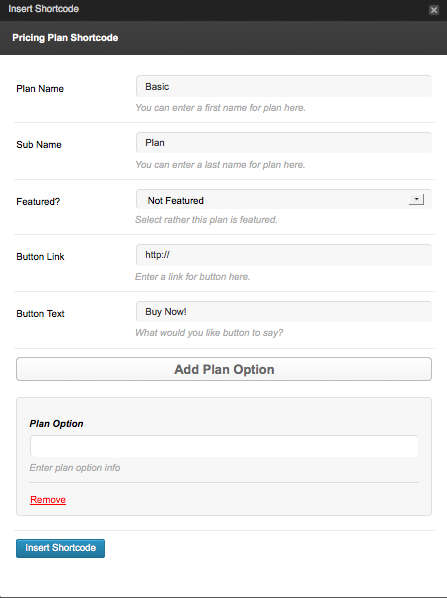
Pricing Plan
1) Give your plan a name and sub name(makes it different colors).
2) Select rather this is a featured plan.
3) And a button link and button text.
4) Type in plan option, and click the "Add Plan Option" button to add more option fields.
5) Click the "Insert Shortcode" button.
Repeat steps for how many plan options you want in the pricing table.
Slider Short Codes
Usage
1) Add your Alt Text
2) And Slider image path and full image(optional)
3) To add more slides, click the "Add Another Slide" and repeat.
Click the "Insert Shortcode" once done.

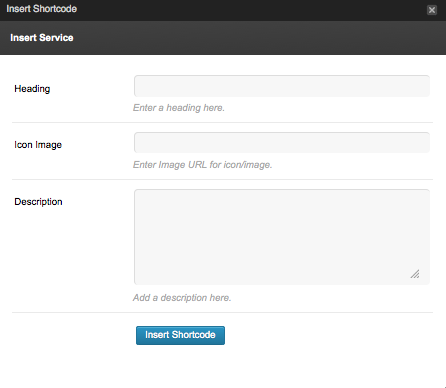
Service Short Codes
Usage
1) Enter Heading text
2) Enter full path to icon/image
3) And some text in the description box
4) Click "Insert Shortcode"
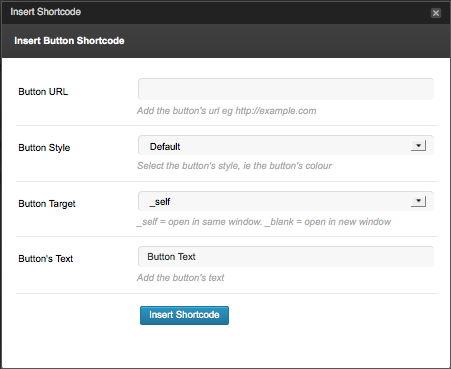
Buttons Short Codes
Usage
1) Enter button url that you want it to go to when clicked.
2) Choose a color(optional)
3) Choose button target.
4) And add button text
Click "Insert Shortcode" when done.
Clear Floats Short Codes
Usage
This is used below colums or floated elements.
This short code is instantly added when clicked.
[clear]
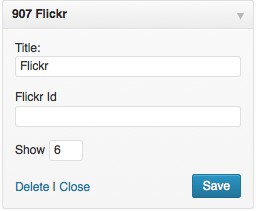
Flickr Widget Widgets
Usage
1) Enter title you'd like displayed as a heading
2) Enter your flickr Id, you can get it HERE
3) Enter a number of how many images you want displayed.
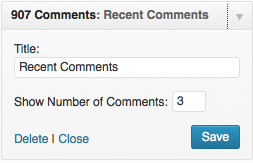
Recent Comments Widgets
Usage
1) Enter title you'd like displayed as a heading
2) Enter a number of how many comments you want displayed.
Video Widget Widgets
Usage
1) Enter title you'd like displayed as a heading
2) Enter a youtube or vimeo link.
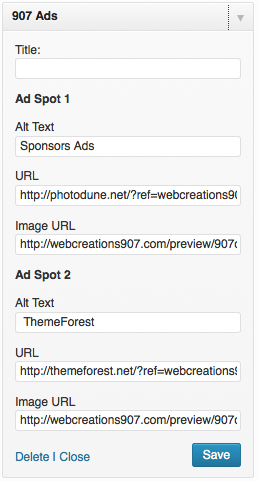
125 Ads Widget Widgets
Usage
1) Enter title you'd like displayed as a heading
2) Enter Alt Text
3) Enter Url
4) Enter image path to ad
Repeat steps for each add spot you want to have.
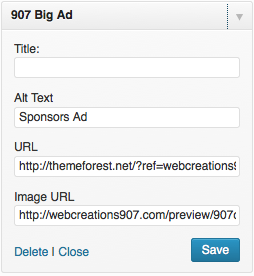
250 Ad Widget Widgets
Usage
1) Enter title you'd like displayed as a heading
2) Enter Alt Text
3) Enter Url
4) Enter image path to ad
Premium Slider Plugins
Translation
Usage
Open the file that is inside the ninzeroseven/languages folder called default.po and edit with a program like PoEdit to translate into your language choice.
Save the file with your language code, like german would be de_DE.mo
Open your wp-config.php file located in your wordpress root directory and find
define('WPLANG', '');
Change to
define('WPLANG', 'de_DE');
You can find a great article on translating with PoEdit here: Internationalizing And Localizing Your WordPress Theme
Credits Some Files and sources used.
- Slightly Modified Options Framework — Theme options panel
- Wordpress.org — Great Tool
- Google Web Fonts — Google's web fonts.
- Yusuke Kamiyamane — Icons used in theme options panel and post type
- Ivor's Documentation Template — Clean documentation template.
- Get Skeleton Grid — Responsive Grid System
- Flexslider — Great Responsive Slider.
- Subtle Patterns — Free Backgrounds.
Thanks again for buying this theme, if you need any help/support at all contact me.