Slider Revolution Responsive WordPress Plugin
The Documentation
This part of the documentation is going to cover, in a step by step instruction the installation of WP Plugins on your WordPress blog in general.
Step 1. The most important task is to make certain you have an upto date backup of your installation! This is always a good thing, not necessarily so important for our plugin but in general.
Step 2. Log into your WordPress Admin area.
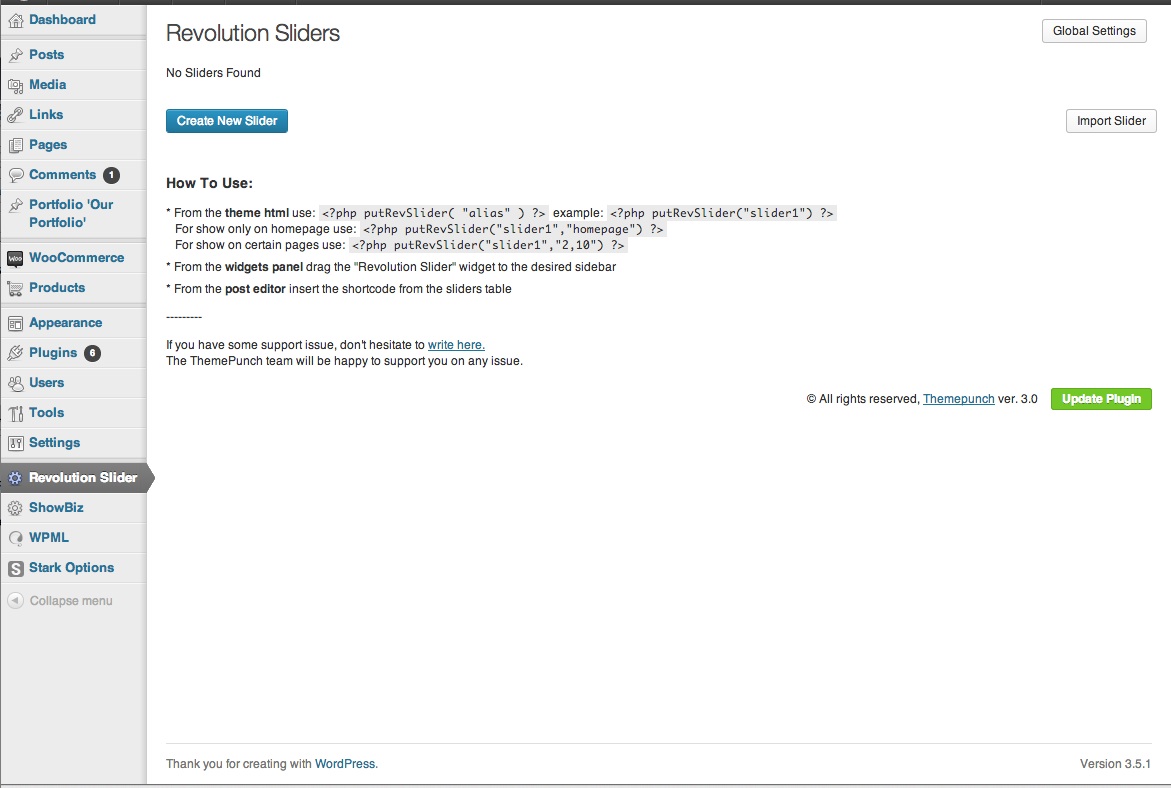
Step 3. Look down the left hand column for “Plugins” and then click on the word “Plugins”.
Step 4. Just to the right of the title “(Manage) Plugins” in the image above, you can see a button marked “Add New”, click this button.


Step 5. The image above shows the option to upload the plugin from your own PC, this is the revslider.zip inside the zip you had previously downloaded from CodeCanyon. Install the zip and click on "Activate Plugin".
Should you ever experience slight upload problems then please stay calm, simply use an FTP program to access your blog, then browse to /public_html/wp-content/plugins and upload the unzipped slider here. Then check out the Plugin page and activate the plugin.
How to create new Slider ?
-
Select the New Installed Revolution Slider
-
Press Create New Slider
Your First Slider
-
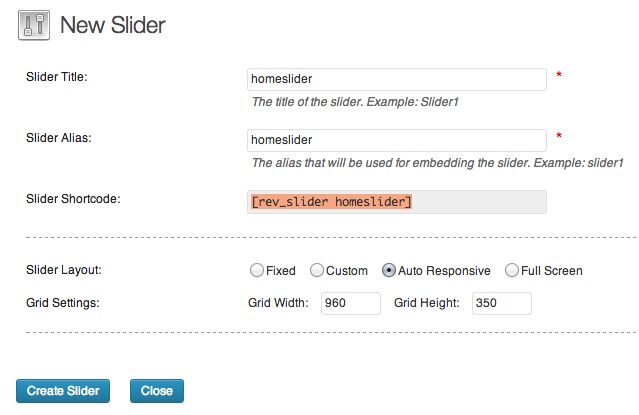
Set tthe Slider Title and the Slider Alias (please dont use special chars and spaces here !)
-
Select your Layout and Settings and press Create Slider. (below you will see a Description for each settings in and Possibilities)
Editing Main Settings
-
Once you Created a Slider, you can open the Slider Settings (Edit Slider) any time to manage any general settings per Slider
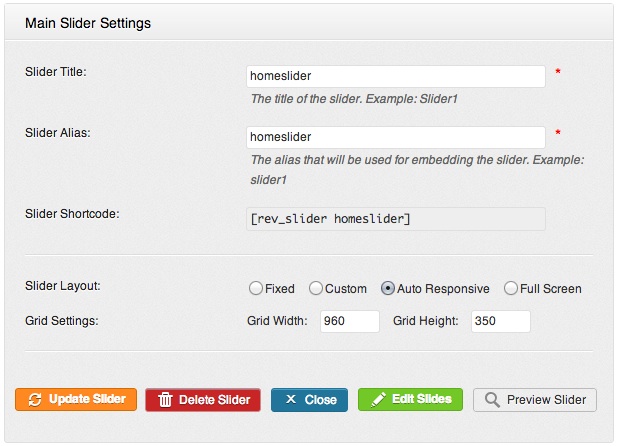
Slider Title
A Internal used Name for the Slider. Only for Backend Usage
Slider Alias
An individual name of the slider. Dont use Speical chars and spaces here. This will be used for ShortCode embeding and for any other art for embeding and corresponding / link internal to the slider.
Slider Shortcode
This is the Shortcode to embed into your Wordpress Pages, widgets etc.
Slider Layouts
-
Fixed
A None Responsive Version of the Slider. Will have a prepared Width and height. Used for Older Themes
-
Custom (it has been called "Responsive" in Earlier version)
A Custom Grid system to set size of Slider per Browser Size. You can define different Levels for sizes. Only used for Frameworks where no Fluid Widths has been used. (i.e. Skeleton)
-
AutoResponsive (it has been called "Fullwdith" in earlier versions)
Used for Fluid Responsive themes, where the Slider calculates its onw size for every Browser size. Only max widt hand height of Grid should be defined. In case the Container Width is not Boxed, it will go Fullwidth Automatically
-
FullScreen
Slider will take the height of Window and center the preseted Grid within. It will always try to go FullHeight and Fullwidth if the wrapping container allows.
Grid Settings
Depending on the Layout you can set the Width and Height of the Captions. The Slider will go Fullwdith or Fullwidth and Fullheight in case you set AutoResponsive or FullScreen. Caption Grid will be centered always within the slider container.
In some cases (Custom) you can set multiple Levels depending on Screen Size. This is not needed in AutoResponsive and FullScreen mode.
Fullscreen mode allows you to set a Container (per class or ID) which heights decrease the height of the FullScreen Slider Container automatically in every responsive level
Update Slider
It updates your last settings to the Slider. If it is not pressed and you leave the Main Settings panel, your settings will be lost.
Delete Slider
Delete your current Slider.
Edit Slides
Open the Edit Slide Panel for further settings per Slide
Preview Slider
Preview the current Slider with all its slides and settings in an iframe.
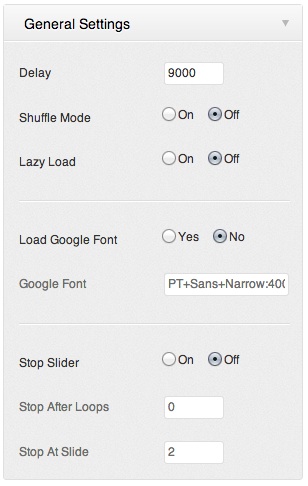
Delay
Set the Delay Globaly for each slide. You can modificate the Delay Time per Slide under the Edit Slide function.
Shuffle Mode
Random Order of Slides on/off
Lazy Load
Use Dummy images during Document Load. Main images per slider are loaded on Demand when the slide is shown first time.
Load Google Font
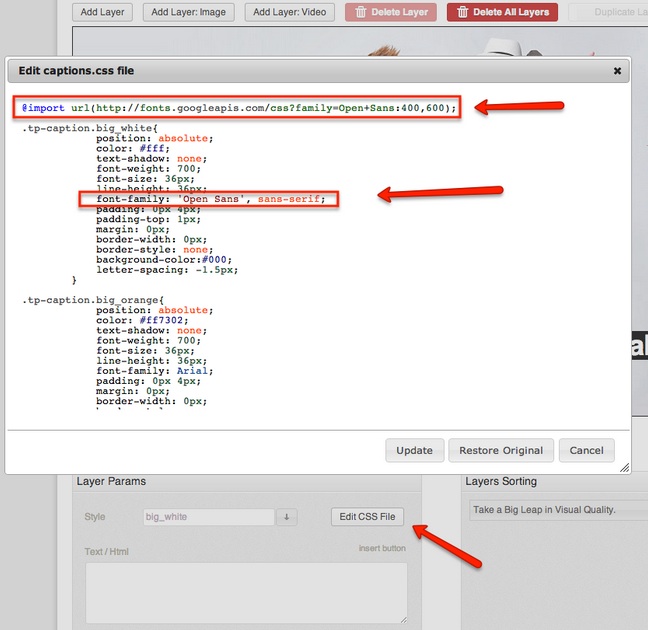
Used for Google Font Embeding in Slider. This is only used in older versions. Please for current Google Font usage use @import in the CSS Edit mode like shown below:
-
Open the slide Editor and Select any of the Captions (or create new one)
-
Click on EDIT CSS FILE
-
Visit The Google Font Page and search for your Font (Screenshot)
-
Click on Quick Use and Select @IMPORT Tab. Add this code to your CSS in Slider Revolution to the Top.
-
To integrate the font, copy the font-family settings from Google Font page to the caption where you wish to use
See also Caption HOW TO USE GOOGLE FONT later below
Stop Slider
Use this setting to stop the Slider after a predefined Loop and at a predefined Slide. Loops 0 means in the first loop to stop and Stop At Slide 1 would stop directly at First slide. i.e. Stop After Loops 2 and Stop At Slide 3 would stop the slider after 2 Loops ath the 3thd slide.
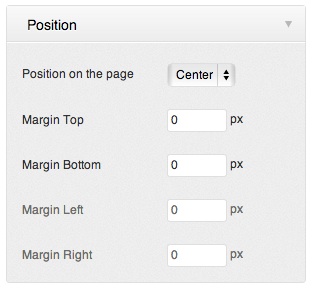
The Position of the Slider within the Contaienr which is wrapping the slider.
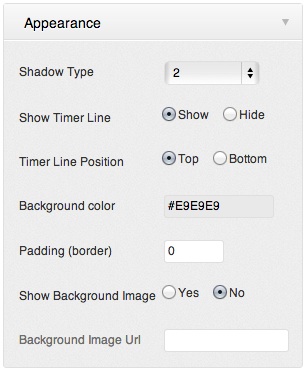
Shadow Type
Choose between different Shadow Effects under the slider. Shadow Height is exclued of the Slide Heigt ! You may need to set extra margin bottom via the Position Settings !
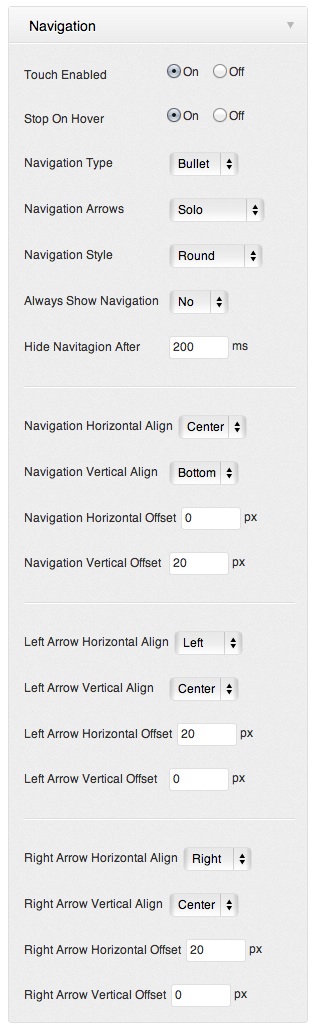
Touch Enabled
Turns on the Swipe function for navigation on mobile devices
Stop On Hove
Stops the Main slide Timer on MOuse Hover. Captions are still playing within the slide
Navigation Type
Set the Layout of navigation. Only Bullets, Bullets and Arrow, Thumbnails or None
Navigation Arrows
Choose between custom positions (solo) or Fixed position next to the bullets /thumbnails.
Navigation Style
The Style / Art of the Navigation
Positions
Per Bullet, Navigation Arrow you can set a Position per Align and per Offsets. I.e. Left Center aligned arrow still can have an offset to move it in different directions
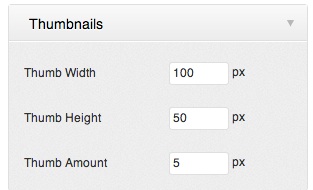
Thumbnail Width and Height and shown Amount of Thumbs in same time. On Hover the Thumbs are scrolled.

Hide Slider Under Width
The Slider will be hidden and stopped if the Browser Size goes under this presetted Size. Works only if Custom Sizes set to Slider
Hide Defined Layers under Width
Hides predefined Captions if the Browser Size is smaller then this predefined size. To select Captions to hide, go in the Slide Editor and turn on / off the option on the Captions one by one.
Hide All Layers Undwe Width
Hides All Captions if the Browser Size is smaller then this predefined size.
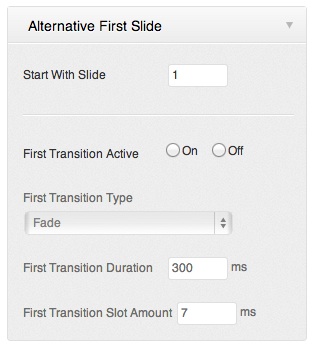
You can set a different First Slide than the Slides Order use. You can set also a different First Transition then it defined in the Slide Editor to make sure that the first Transition is some Eye Catching animation, but later only use Slideing transitions i.e
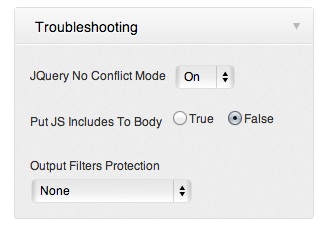
In Some Theme the Output of the Slider is broken , filled due br and p tags. Also soe theme has jQuery conflicts or embeding the jQuery library in a way which would breake the slider. In this case please turn on the OutPut Filters, and try the different settings to see if the Output art fix your issue. (most Problem solved by setting this to by Echo)
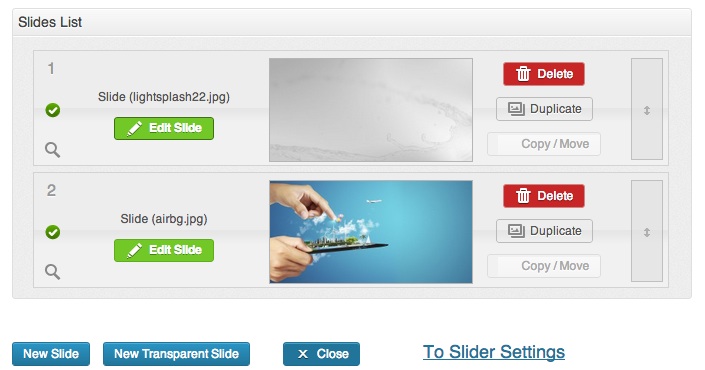
Add New Slide to the Slider
Click on Slide Editor to get in the Overview of the Slides added in the Slider. If no Slides added yet, New Slide or New Transparent Slide can be used to add Slides to the Slider. Add New slide can be Done also in the TAB View once the Edit Slide View is opened. See Later Below.
Delete / Duplicate / Copy/Move
Each Slide can be Deleted, Duplicated or Copied / Moved into an other Slider !
Turn On /off Publishing of the Slider
During Editing / Modificating the Slide it is clever to turn off the Visibility on Frontend. CLick simple on the 
Drag And Drop to Reorder
Simple Drag and Drop the slides to reorder them. Use the  for this.
Navigate between the Slides simple selecting The Tabs on the top. Dont forget to Update the Slide before you Leave one tab !
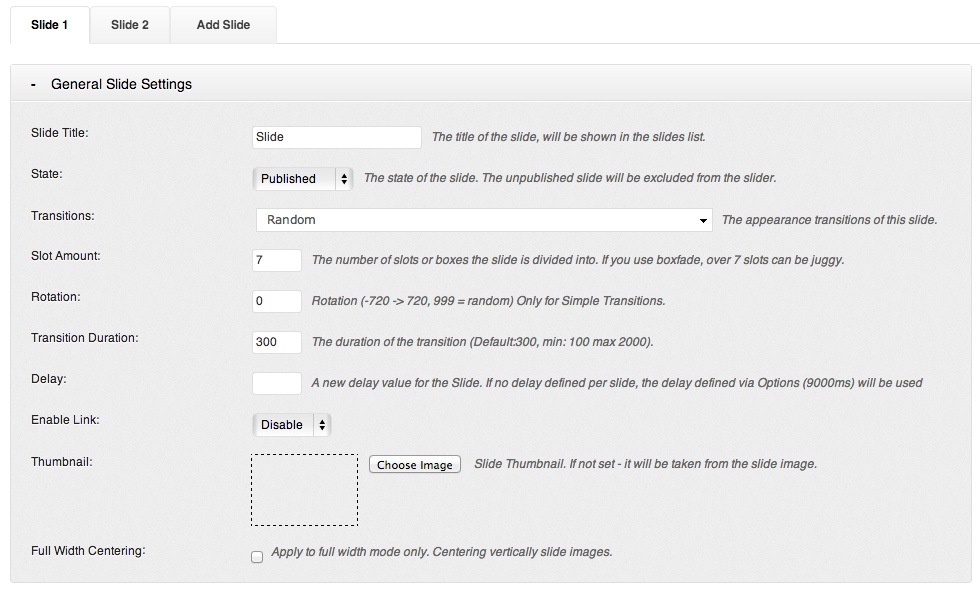
Each Slide has its own Genearal Setting. You can set transitions, Local delays, thumbnails etc. here.
Slide Title
Used only Internal Naming of the slides
State
Published / Unpublished - used for Editing, modificating the slide. If it is Unpublished, frontend wont show this slide at all.
Transitions
The Animation Style how the Slide appearance. You can select more than one from a multiplie choise drop down list. Every new loop will use an other Transition if you selected more then one.
Slot Amount
The Amount of Boxes / Slots the slides divided into during the animation.
Rotation
The Rotation Degree on Simple Transitions. (-720 - 720, 999 = random)
Transition Duration
The Duration of the Transition. (Default 300, min 100 max 2000 ms)
Delay
A Local Delay for Slide. It overwrites the Global setting
Enable Link
it allows a Full width/height link on the Slide. You can set Link Target and LInk URL here, or a Built in function like swap to slide X, previous Slide, Next Slide
Full Width Centering
it allows the Slide Main Image to center Vertical. Basically it is top center aligned in Auto Responsive mode, and Top Left aligned in Custom Responsive Mode
The Image Source for the Main Image

A Slide can have an Image , Solid Color or Transparent Image as Main Image. This Image is the "Main Layer" in the background which has been animated via the General Settings predefined Transtions parameter.
The Drag And Drop Editor
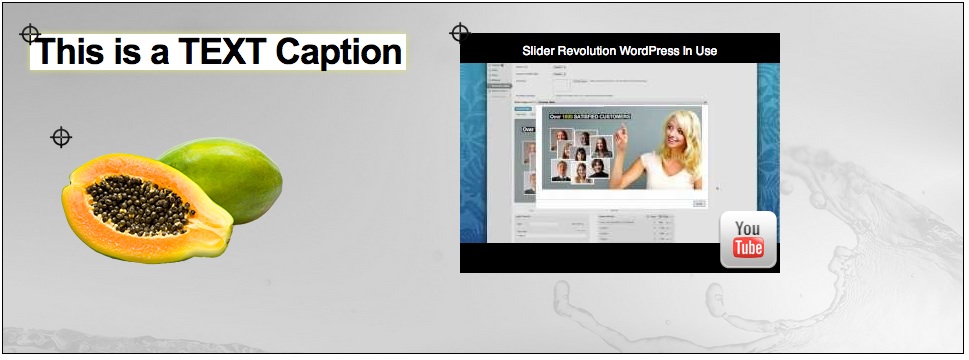
Here you can Drag And Drop Move any Added Layer. The Best Way to move the Elements in the Right Position. Items are default aligned to left / top but via the Layer Styleing you can select different Aligns.
You can choose from following layers / captions: HTML Markups, Image, Video

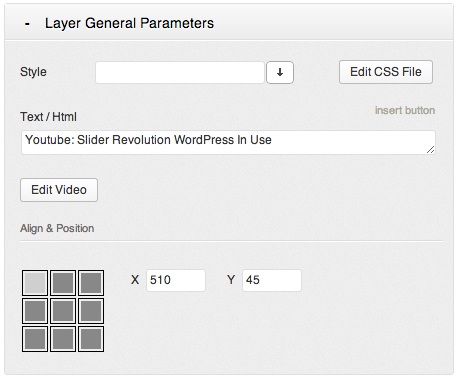
For individuall TEXT / HTML Markup Layer click on simple Add Layer and follow the following settings:
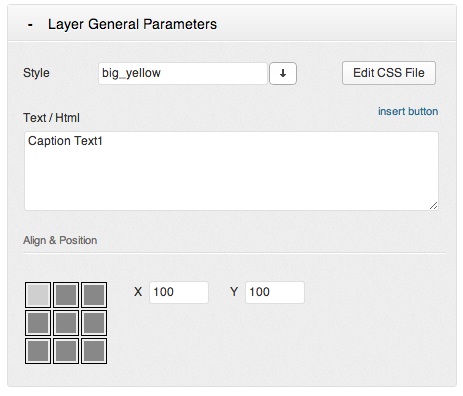
Style / Edit CSS File
To Define a predefined Style or add your own Style use the Style Drop Down list. You can change the Styling of the captions / Layers via the Embeded CSS Editor
Use HTML5 Standard markups in case you wish to embed paragraphs, headings, buttons etc.
The Captions have the white-space:nowrap setting default. It is important because of the transitions. Please use <br> for linebreaking, or add different layers for multiple lines.
Align & Positions
Set the Align of the Layers / Captions. Left Top is default. Drag and Drop move of the Layer will based on the Align. If you set the Align to Center Center, the Drag And drop will be based on this aligned position and use an Offset.
i.e. Center Center Offset X -100px Offset Y -100px will be used in every reposnive size linear calculated. If the Screen size is scaled to 50% than the Item is still in the middle of the grid and offset is -50px -50px (linear calculated).
Center Center snaps the Center Center of the Layer to the Center Center position of the Gird. Right Bottom snaps the Rightr bottom corner of the Layer to the Right Bottom corner of the Grid et.c..

Start Transition
The way the Caption appear on the screen. Select one of the Aniamtion , Easing and Speed.
End Transition
Optional. If not set, the Reverse Aniamtion will be used as set in the Start Transtion.
In case the slide sould stay all the time on the slide, but end animation should be different then Start animation, please select your End animation, and set End Time to the same as the Slide Delay. If no End Time set, End animation will be ignored !
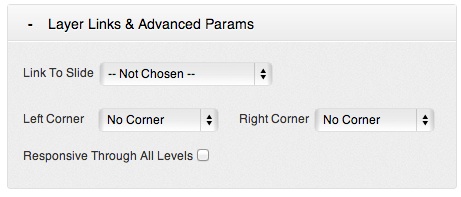
Link to Slide
Set a Special Link, like Swap to Previous / Next slide, Predefined Slide, Scroll Under the Slider etc.
Left Corner / Right Corner
Draw a Sharp Corner of the Caption. Only works if Background Color has been set for Caption
Responsive Through All Levels
If set, all HTML COntainers within this Caption are resized linear to Slider Sizes. Default turned off, and only top level markup within Caption is resized
You can choose from following layers / captions: HTML Markups, Image, Video
For individuall Image Layer click on simple Add Layer and follow the following settings:
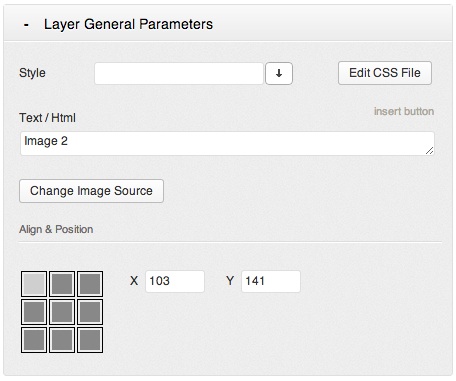
Style / Edit CSS File
To Define a predefined Style or add your own Style use the Style Drop Down list. You can change the Styling of the captions / Layers via the Embeded CSS Editor
Use HTML5 Standard markups in case you wish to embed paragraphs, headings, buttons etc.
The Captions have the white-space:nowrap setting default. It is important because of the transitions. Please use <br> for linebreaking, or add different layers for multiple lines.
Change Image Source
Change the Image Source itself
Align & Positions
Set the Align of the Layers / Captions. Left Top is default. Drag and Drop move of the Layer will based on the Align. If you set the Align to Center Center, the Drag And drop will be based on this aligned position and use an Offset.
i.e. Center Center Offset X -100px Offset Y -100px will be used in every reposnive size linear calculated. If the Screen size is scaled to 50% than the Item is still in the middle of the grid and offset is -50px -50px (linear calculated).
Center Center snaps the Center Center of the Layer to the Center Center position of the Gird. Right Bottom snaps the Rightr bottom corner of the Layer to the Right Bottom corner of the Grid et.c..
Start Transition
The way the Caption appear on the screen. Select one of the Aniamtion , Easing and Speed.
End Transition
Optional. If not set, the Reverse Aniamtion will be used as set in the Start Transtion.
In case the slide sould stay all the time on the slide, but end animation should be different then Start animation, please select your End animation, and set End Time to the same as the Slide Delay. If no End Time set, End animation will be ignored !
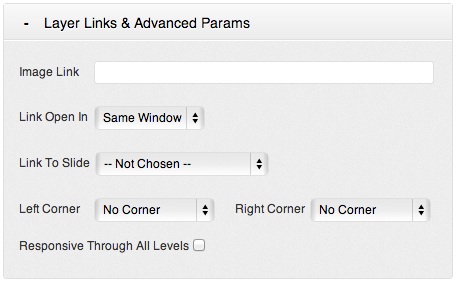
Image Link
The Link URL if Image has been clicked
Link Open In
The Link Target if Image has been clicked
Link to Slide
Set a Special Link, like Swap to Previous / Next slide, Predefined Slide, Scroll Under the Slider etc.
You can choose from following layers / captions: HTML Markups, Image, Video
For individuall Video Layer click on simple Add Layer: Video and follow the following settings:
Choose from Youtbe / Vimeo / HTML5:
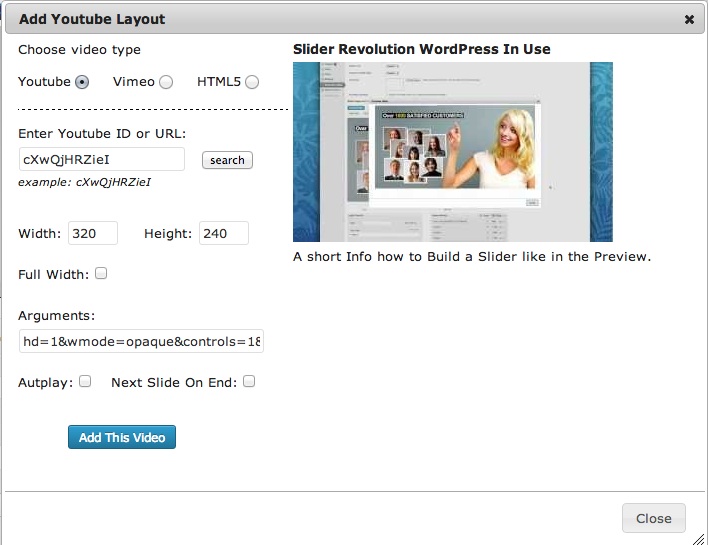
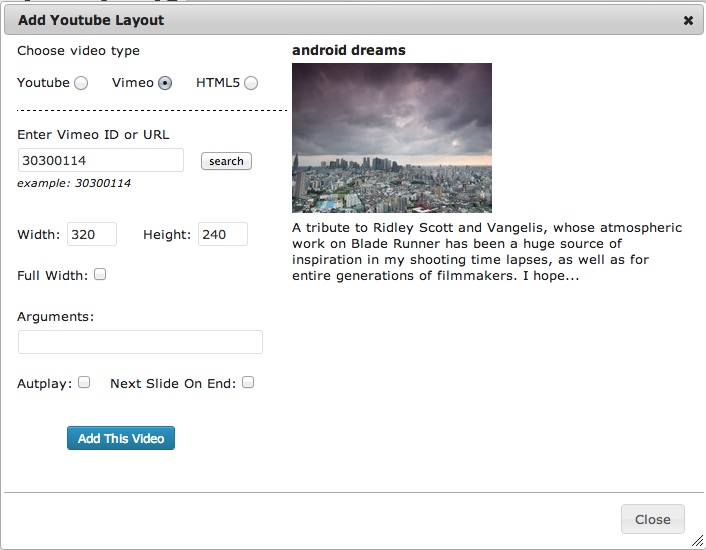
YouTube / Vimeo Settings
Enter ID / URL
Set the Vimeo / YouTuve Video ID here and Click on Search
Width / Height
Set the Basic Width and Height you wish to present your Iframe Embeded Video in the Slider
FullWidth
If selected, Video will be Shown in FullWidth Mode (within the Grid !) on the Slider
Arrguments
Set Indiivdual iFrame / Video Arguments here
AutoPlay
If Slide is loaded, video will play automaticaly
Next Slide on End
After Video has been played, next slide Transition starts automatically

Enter Sources of Video (can set different Sources for Fallbacks)
Use an Image to show when Video is not Player
MP4/WEBM, OGV Sources should be added with Absolute Link
Width / Height
Set the Basic Width and Height you wish to present your Iframe Embeded Video in the Slider
FullWidth
If selected, Video will be Shown in FullWidth Mode (within the Grid !) on the Slider
Arrguments
Set Indiivdual iFrame / Video Arguments here
AutoPlay
If Slide is loaded, video will play automaticaly
Next Slide on End
After Video has been played, next slide Transition starts automatically
Style / Edit CSS File
To Define a predefined Style or add your own Style use the Style Drop Down list. You can change the Styling of the captions / Layers via the Embeded CSS Editor
Use HTML5 Standard markups in case you wish to embed paragraphs, headings, buttons etc.
The Captions have the white-space:nowrap setting default. It is important because of the transitions. Please use <br> for linebreaking, or add different layers for multiple lines.
Edit Video
Open the Dialog Window as by Adding the Video Layer
Align & Positions
Set the Align of the Layers / Captions. Left Top is default. Drag and Drop move of the Layer will based on the Align. If you set the Align to Center Center, the Drag And drop will be based on this aligned position and use an Offset.
i.e. Center Center Offset X -100px Offset Y -100px will be used in every reposnive size linear calculated. If the Screen size is scaled to 50% than the Item is still in the middle of the grid and offset is -50px -50px (linear calculated).
Center Center snaps the Center Center of the Layer to the Center Center position of the Gird. Right Bottom snaps the Rightr bottom corner of the Layer to the Right Bottom corner of the Grid et.c..
Start Transition
The way the Caption appear on the screen. Select one of the Aniamtion , Easing and Speed.
End Transition
Optional. If not set, the Reverse Aniamtion will be used as set in the Start Transtion.
In case the slide sould stay all the time on the slide, but end animation should be different then Start animation, please select your End animation, and set End Time to the same as the Slide Delay. If no End Time set, End animation will be ignored !
Link to Slide
Set a Special Link, like Swap to Previous / Next slide, Predefined Slide, Scroll Under the Slider etc.

In the Layer Sorting Table you can drag and Drop the layers to change their z-Index or Start time automatically.
Choose "By Depth" for editing the z-index of the layer/caption.
Choose "By Time" for editing the Timing of the layer/caption.
Manually Editig is also possible.
Click on the "eye" icon to hide / show the Layer from the Drag & Drop Section above, for easy Editing of the captions.
Clickin on one Layer selects that Layer for Further editing.
To add via Shortcode
-
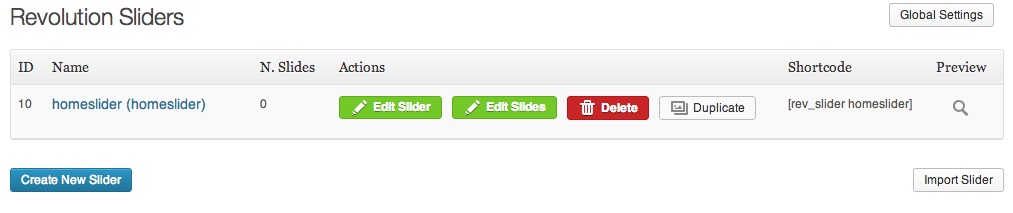
Simple open the Revolution Slider Backend for the overview list of Sliders.
-
Copy the Shortcode you wish to embed in the page.
-
Paste the Shortcode into your page.


Alternative Ways to add the Slider to your Theme:
-
* From the theme html use:
<?php putRevSlider( "alias" ) ?> example: <?php putRevSlider("homeslider") ?>
For show only on homepage use: <?php putRevSlider("homeslider","homepage") ?>
For show on certain pages use: <?php putRevSlider("homeslider","2,10") ?>
-
* From the widgets panel drag the "Revolution Slider" widget to the desired sidebar
-
* From the post editor insert the shortcode from the sliders table
-
Open the slide Editor and Select any of the Captions (or create new one)
-
Click on EDIT CSS FILE
-
Visit The Google Font Page and search for your Font (Screenshot)
-
Click on Quick Use and Select @IMPORT Tab. Add this code to your CSS in Slider Revolution to the Top.
-
To integrate the font, copy the font-family settings from Google Font page to the caption where you wish to use

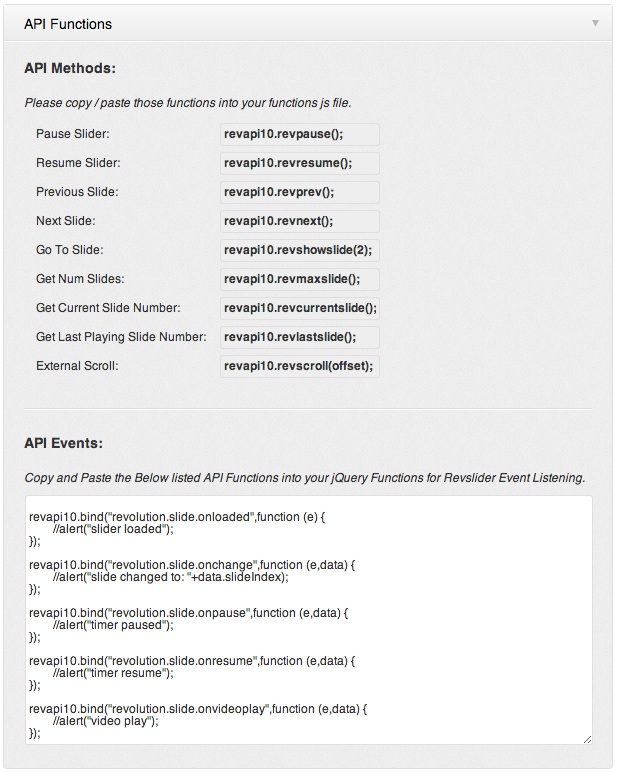
Each Slider can be Drived due different API Functions. Simple Copy the API Function you need from this table above and embed it into your function.js or in your custom javascript document.
You can use all events and functions per Slider.
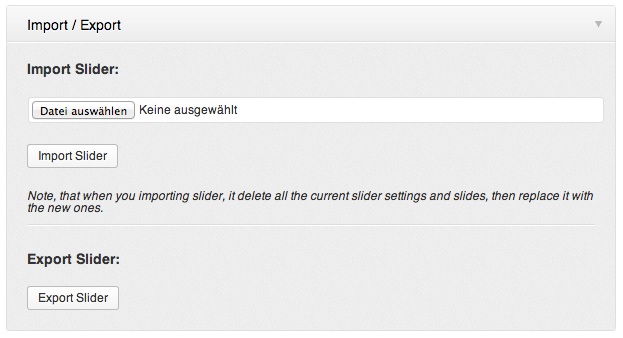
Import
To Import Existing Sliders (i.e. from our FREE EXPORTS) you can use the Import Function to oiverweite existing Slider Settings or to create a new Slide from your Exported settings.
Choose the Export file (txt) and click on Import Slider. To import CSS Settings you will need to copy / paste the CSS Settings you exported earlier in the EDIT CSS Section (under the Slide Editing View)
Export
To Export the Current Slider just click simple on the Export Slider button. Please dont forget to extra save your CSS Settings under the EDIT CSS Section (under the Slide Editing View)
For Setting the Rights for WP Backend or using Revslider Libraries Globally / Locally please use the Global Settings. 
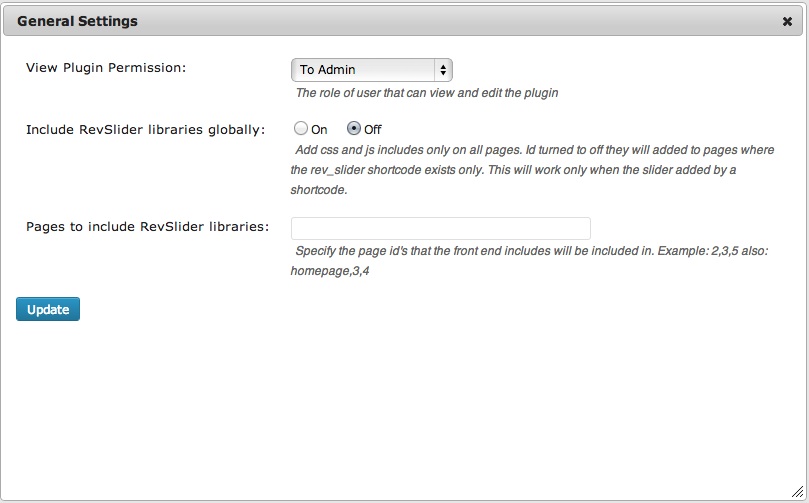
Plugin Permissions are Granted to
Admin
Editor & Admin
Author & Editor & Admin
Include Revslider libraries globally
Add css and js includes only on all pages. Id turned to off they will added to pages where the rev_slider shortcode exists only. This will work only when the slider added by a shortcode.
Pages to include RevSlider libraries
Specify the page id's that the front end includes will be included in. Example: 2,3,5 also: homepage,3,4
If you face problems with the installation or customization of our product please do not hesitate to contact us via our support ticket system:
http://themepunch.ticksy.com